Is there anything worse than a blank page? We’ve all been there and it’s intimidating and painful. Don’t worry - ApolloPad has great planning tools which will help you visualize the journey ahead. But, what are they, and how can you use them?
Project overview
When you start a project, you’ll need to fill out some basic project information so that you can set your basic ideas and targets from the get-go.
Let’s indulge me for a moment and pretend I’m F. Scott Fitzgerald. I’ve set my project title, The Great Gatsby, and my project type, a book. I’ve set myself a target word-count and provided a brief synopsis of the plot.

This will be my big picture goal and my word-count progress will show in my dashboard when I log in. It will allow me to step back and look at my project as a whole, motivated by my progress and keeping my eye on the prize - my completed Great American Novel.
Back in high school art class, I got engrossed in my drawings and paintings and had my nose a few inches from the page. My teachers always told me to step back a few feet and look at my work head-on.
It was only then that I realized how well it was shaping up. The project overview in ApolloPad is just like that.
Project outlining
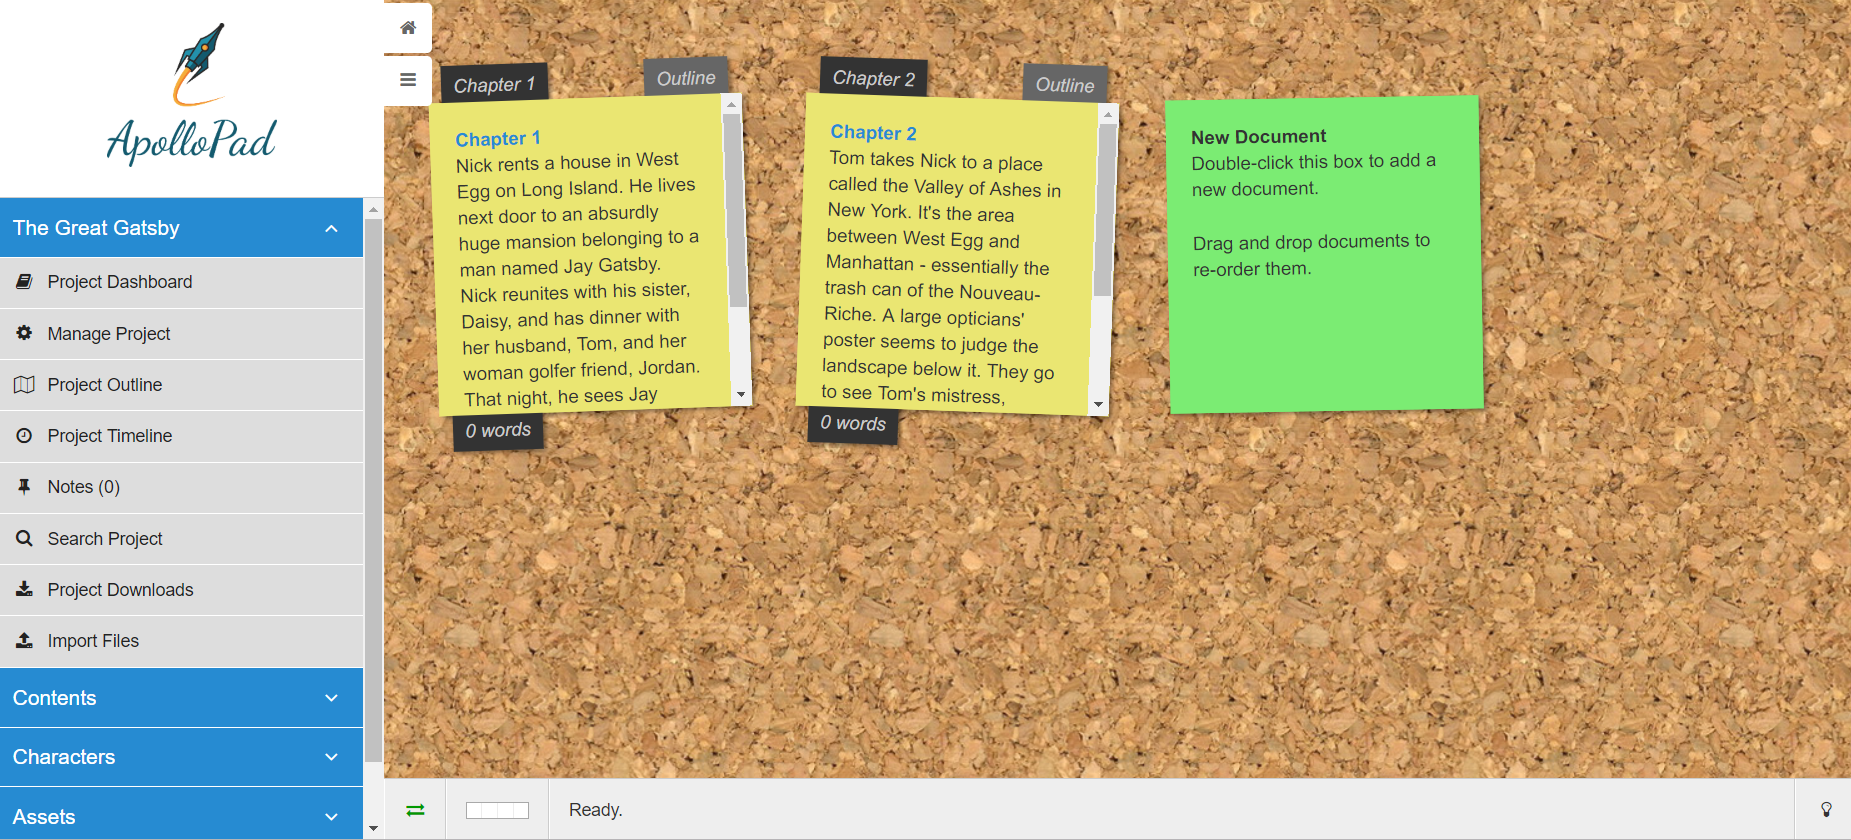
A board of sticky notes, but without all the clutter at your writing desk. ApolloPad’s project outline feature is shown by the map icon in your project tool kit.
Double-click on the first post-it to write your first document outline. I’m doing my example by chapter.

You’ll then see a document metadata window where you can input your chapter summary. Keep it simple and concise, but lay out all the main events which will happen in the chapter.
We’ve already got our big picture, so your post-its will allow you to visualize smaller goals - your chapters - to achieve within your big goal.
I’m a fan of the classic corkboard - it brings a sense of tactility to the digital planning process.
If you’re not, you can change your visuals in your account → preferences.

As well as being able to edit your theme and font, there are loads of corkboard textures to choose from - there’s even a Game of Thrones theme.
We think it’s important for you to tailor your work environment, so if you’re writing a horror novel and you want to have a blood-spattered background, so be it. Who are we to judge?
Timelines
This is where your planning process gets really interesting. If you want to be really confident when you take the plunge into writing, it’s a good idea to remember the five Ws - who, what, when, where and why.
You’ve got your chapter summaries already, but how do they fit into the bigger picture?
This is your opportunity to think about your overarching big events that shape the way your novel is structured.
Click the ‘+’ symbol to create a new timeline event.

You’ll then have this handy pop-up which will ask you to input the date of the event - this doesn’t have to be the exact date. I’ve put a more general event - Spring 1922.
What’s the name of the event that has significance in how your story plays out? I consider the start of Tom’s affair to be important.
It’s not mentioned right at the beginning of the novel - your timelining is just to give context to your actual content so that you can make sense of the events that happen in-between.
You could either write your timeline events in the order told in your novel or you could write it in chronological order.
Chronological order is useful if you have some backstory you’re going to introduce later and want a helpful reference point for when everything happened.
You can choose an icon for your event which is a great way to glance over your project and find an important detail quickly - almost like putting emojis on your phone calendar events. Or is that just me?
At any rate, I’ve chosen a car for my Myrtle-related event, since her husband owns a garage and, well, a car is important later.
![]()
You can choose colors, too. This is useful for me because I can choose colors for different themes or characters. I’ve picked red for Tom’s affair because red is symbolic of both lust and violence - it’s Tom all over.

Do this a few more times and before you know it, you’ll have a decent plan going. You know the main events you want to happen in the novel and where the chapters fit in alongside these.
You’ve also broken down what you want to happen in each chapter, so your goals will seem easier to achieve.
Just take it one chapter at a time. You could write chapter five before you wrote chapter one if you wanted. The important thing is to set achievable goals.
Planning that novel took a lot of organization, creativity and hard work. That blank page doesn’t look so bad now, does it? Go ahead and make yourself a cup of tea before you get started on the bigger task ahead of you.
How do you like to plan your work? Do you take the classic approach of writing it from beginning to the end? Or do you prefer diving into the nitty-gritty of the middle and writing around it? Let us know in the comments.

